
Mình đang xây dựng nhóm "anh Thầy & Đồng bọn (Hỏi đáp, chia sẻ kiến thức)" mục đích để các bạn có một nơi giao lưu trao đổi.
Đội MOD của group và mọi người sẽ hỗ trợ bạn ngay lập tức.
Join ở đây nè: https://www.facebook.com/groups/anhthayvadongbon
Tên bài học: [Android] RecyclerView với nhiều kiểu item
Thời gian học: 1 giờ | Nguồn: VnCoder | Lượt xem: 968 lượt xem
RecyclerView với nhiều kiểu item (RecyclerView with multiple view type)

Hầu hết chúng ta đã quen thuộc với RecycleView có một kiểu item, tức là mỗi dòng có giao diện giống nhau, chỉ khác về dữ liệu hiển thị. Trong bài viết này, chúng ta sẽ cùng tìm hiểu cách triển khai RecyclerView với nhiều kiểu item.
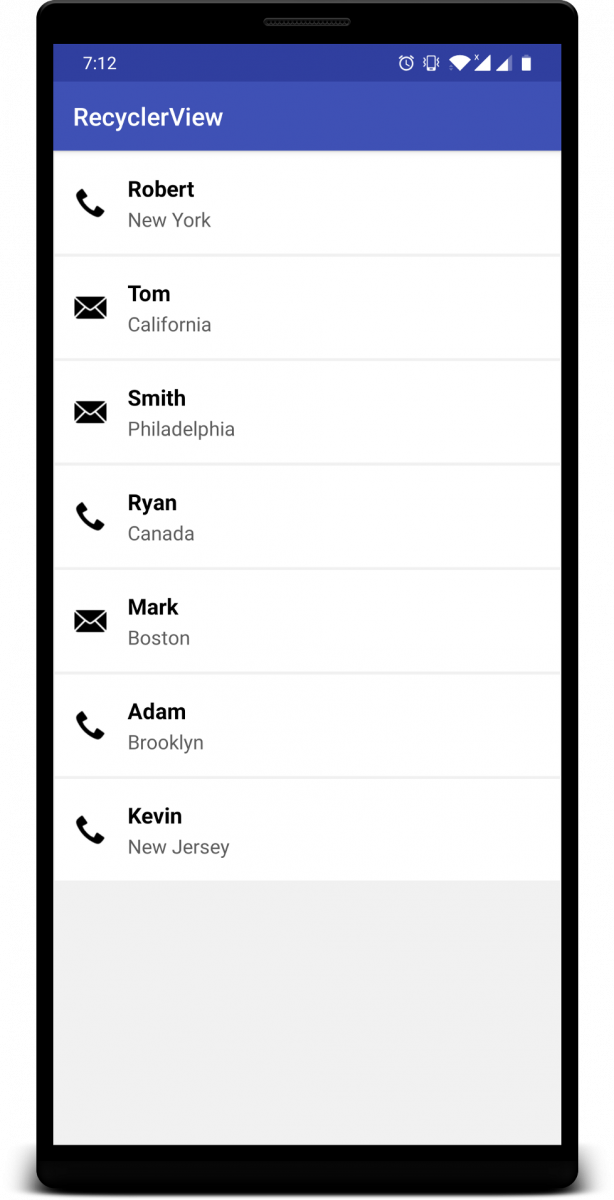
Ví dụ về Android RecyclerView với nhiều kiểu item.
- Bước 1: Tạo 2 file layout cho 2 kiểu item
item_call.xml
<?xml version="1.0" encoding="utf-8"?>
<LinearLayout xmlns:android="http://schemas.android.com/apk/res/android"
    android:layout_width="match_parent"
    android:layout_height="wrap_content"
    android:background="#ffffff"
    android:orientation="horizontal"
    android:layout_margin="1dp"
    android:padding="8dp">

    <ImageView
        android:id="@+id/imgCall"
        android:layout_width="26dp"
        android:layout_height="26dp"
        android:layout_gravity="center_vertical"
        android:layout_margin="8dp"
        android:src="@android:drawable/stat_sys_phone_call"
        android:tint="#000000" />

    <LinearLayout
        android:layout_width="match_parent"
        android:layout_height="wrap_content"
        android:orientation="vertical"
        android:padding="8dp">

        <TextView
            android:id="@+id/txtName"
            android:layout_width="match_parent"
            android:layout_height="wrap_content"
            android:padding="1dp"
            android:text="Robert"
            android:textColor="#000000"
            android:textSize="18sp"
            android:textStyle="bold" />

        <TextView
            android:id="@+id/txtAddress"
            android:layout_width="match_parent"
            android:layout_height="wrap_content"
            android:padding="1dp"
            android:text="Manhattan"
            android:textColor="#5d5d5d"
            android:textSize="16sp" />


    </LinearLayout>

</LinearLayout>
item_email.xml
<?xml version="1.0" encoding="utf-8"?>
<LinearLayout xmlns:android="http://schemas.android.com/apk/res/android"
    android:layout_width="match_parent"
    android:layout_height="wrap_content"
    android:background="#ffffff"
    android:orientation="horizontal"
    android:layout_margin="1dp"
    android:padding="8dp">

    <ImageView
        android:id="@+id/imgMail"
        android:layout_width="26dp"
        android:layout_height="26dp"
        android:layout_gravity="center_vertical"
        android:layout_margin="8dp"
        android:src="@android:drawable/ic_dialog_email"
        android:tint="#000000" />

    <LinearLayout
        android:layout_width="match_parent"
        android:layout_height="wrap_content"
        android:orientation="vertical"
        android:padding="8dp">

        <TextView
            android:id="@+id/txtName"
            android:layout_width="match_parent"
            android:layout_height="wrap_content"
            android:padding="1dp"
            android:text="Robert"
            android:textColor="#000000"
            android:textSize="18sp"
            android:textStyle="bold" />

        <TextView
            android:id="@+id/txtAddress"
            android:layout_width="match_parent"
            android:layout_height="wrap_content"
            android:padding="1dp"
            android:text="Manhattan"
            android:textColor="#5d5d5d"
            android:textSize="16sp" />

    </LinearLayout>

</LinearLayout>
- Bước 2: Tạo model
Chúng ta sử dụng chung lớp Employee cho cả 2 item. Lớp Employee gồm 2 trường số điện thoại và email. Nếu để trống điện thoại, điều đó có nghĩa là giá trị cho email là bắt buộc và ngược lại nếu giữ email trống, điều đó có nghĩa là giá trị của điện thoại là bắt buộc. Vì vậy, nếu điện thoại trống thì RecyclerView hiển thị giao diện người dùng email và nếu email trống thì RecyclerView hiển thị giao diện người dùng cuộc gọi.
ArrayList<Employee> employees = new ArrayList<>();

Employee employee = new Employee();
employee.setName("Robert");
employee.setAddress("New York");
employee.setPhone("+61234456");
employees.add(employee);

employee = new Employee();
employee.setName("Tom");
employee.setAddress("California");
employee.setEmail("tom_frank@gmail.com");
employees.add(employee);

employee = new Employee();
employee.setName("Smith");
employee.setAddress("Philadelphia");
employee.setEmail("smith_carrol@gmail.com");
employees.add(employee);

employee = new Employee();
employee.setName("Ryan");
employee.setAddress("Canada");
employee.setPhone("+612001456");
employees.add(employee);

employee = new Employee();
employee.setName("Mark");
employee.setAddress("Boston");
employee.setEmail("mark_walmerd@gmail.com");
employees.add(employee);

employee = new Employee();
employee.setName("Adam");
employee.setAddress("Brooklyn");
employee.setPhone("+61211780");
employees.add(employee);

employee = new Employee();
employee.setName("Kevin");
employee.setAddress("New Jersey");
employee.setPhone("+94221035");
employees.add(employee);
// set adapter
EmployeeAdapter adapter = new EmployeeAdapter(this, employees);
recyclerView.setLayoutManager(new LinearLayoutManager(this));
recylerView.setAdapter(adapter);
- Bước 3: Tạo adapter
Với RecyclerView thông thường chúng ta sử dụng adapter extends RecyclerView.Adapter<CustomViewHolder> nhưng đây là trường hợp có nhiều view holders nên chúng ta tạo adapter extends RecyclerView.Adapter<RecyclerView.ViewHolder>.
- getItemViewType()
private static int TYPE_CALL = 1;
private static int TYPE_EMAIL = 2;

@Override
public int getItemViewType(int position) {
    if (TextUtils.isEmpty(employees.get(position).getEmail())) {
        return TYPE_CALL;

    } else {
        return TYPE_EMAIL;
    }
}
- Tạo 2 view holder cho 2 item
class CallViewHolder extends RecyclerView.ViewHolder {

    private TextView txtName;
    private TextView txtAddress;

    CallViewHolder(@NonNull View itemView) {
        super(itemView);
        txtName = itemView.findViewById(R.id.txtName);
        txtAddress = itemView.findViewById(R.id.txtAddress);
    }
}
class EmailViewHolder extends RecyclerView.ViewHolder {

    private TextView txtName;
    private TextView txtAddress;

    EmailViewHolder(@NonNull View itemView) {
        super(itemView);
        txtName = itemView.findViewById(R.id.txtName);
        txtAddress = itemView.findViewById(R.id.txtAddress);
    }
}
- onCreateViewHolder
@NonNull
@Override
public RecyclerView.ViewHolder onCreateViewHolder(@NonNull ViewGroup viewGroup, int viewType) {
    View view;
    if (viewType == TYPE_CALL) { // for call layout
        view = LayoutInflater.from(context).inflate(R.layout.item_call, viewGroup, false);
        return new CallViewHolder(view);

    } else { // for email layout
        view = LayoutInflater.from(context).inflate(R.layout.item_email, viewGroup, false);
        return new EmailViewHolder(view);
    }
}
- onBindViewHolder
@Override
public void onBindViewHolder(@NonNull RecyclerView.ViewHolder viewHolder, int position) {
    if (getItemViewType(position) == TYPE_CALL) {
        ((CallViewHolder) viewHolder).setCallDetails(employees.get(position));
    } else {
        ((EmailViewHolder) viewHolder).setEmailDetails(employees.get(position));
    }
}

private void setCallDetails(Employee employee) {
    txtName.setText(employee.getName());
    txtAddress.setText(employee.getAddress());
}
private void setEmailDetails(Employee employee) {
    txtName.setText(employee.getName());
    txtAddress.setText(employee.getAddress());
}
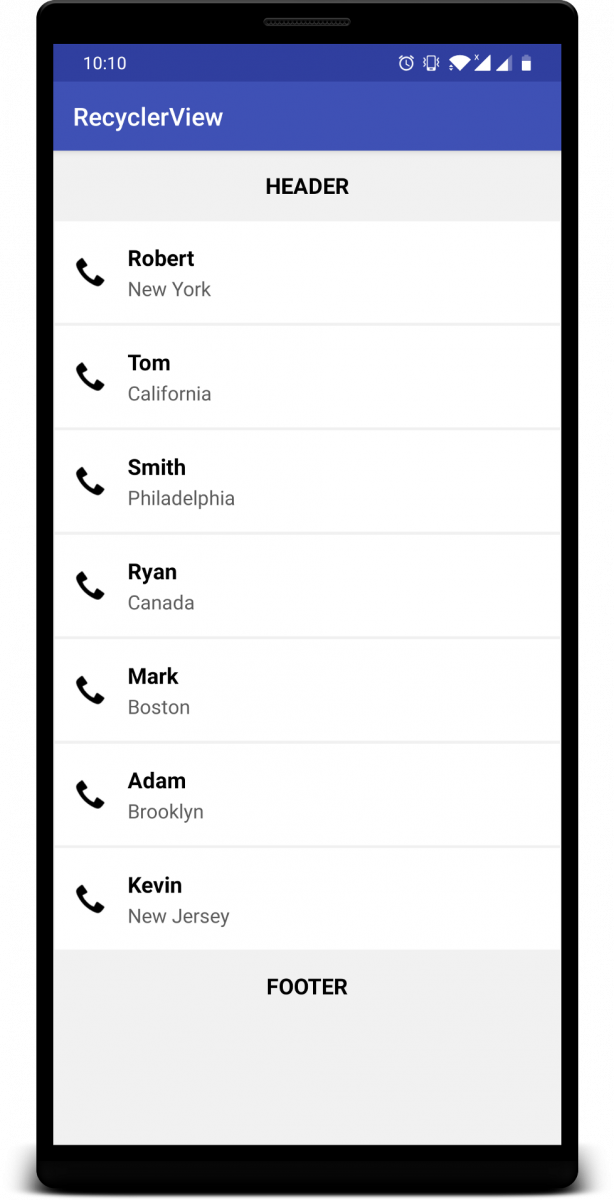
Bạn cũng có thể thêm header hay footer trong RecyclerView bằng tính năng này. Trong ví dụ dưới đây, chỉ có 3 loại item: header, footer và item call trong một recyclerview duy nhất bằng cách sử dụng nhiều kiểu item.
Chào thân ái và quyết thắng!
Link bài viết gốc: https://medium.com/@droidbyme/android-recyclerview-with-multiple-view-type-multiple-view-holder-af798458763b
This site does not store any files on its server. We only index and link to content provided by other sites. Please contact the content providers to delete copyright contents if any and email us, we'll remove relevant links or contents immediately.
Trang web này không lưu trữ bất kỳ tệp (files) nào trên máy chủ (server). Chúng tôi chỉ lập chỉ mục và liên kết đến nội dung được cung cấp bởi các trang web khác. Vui lòng liên hệ với các nhà cung cấp nội dung để xóa nội dung bản quyền nếu có và gửi email cho chúng tôi, chúng tôi sẽ xóa các liên kết hoặc nội dung có liên quan ngay lập tức.
Bạn có muốn xác nhận hoàn thành bài học này không?